
Modeling the SPAD XIII in Cinema 4D

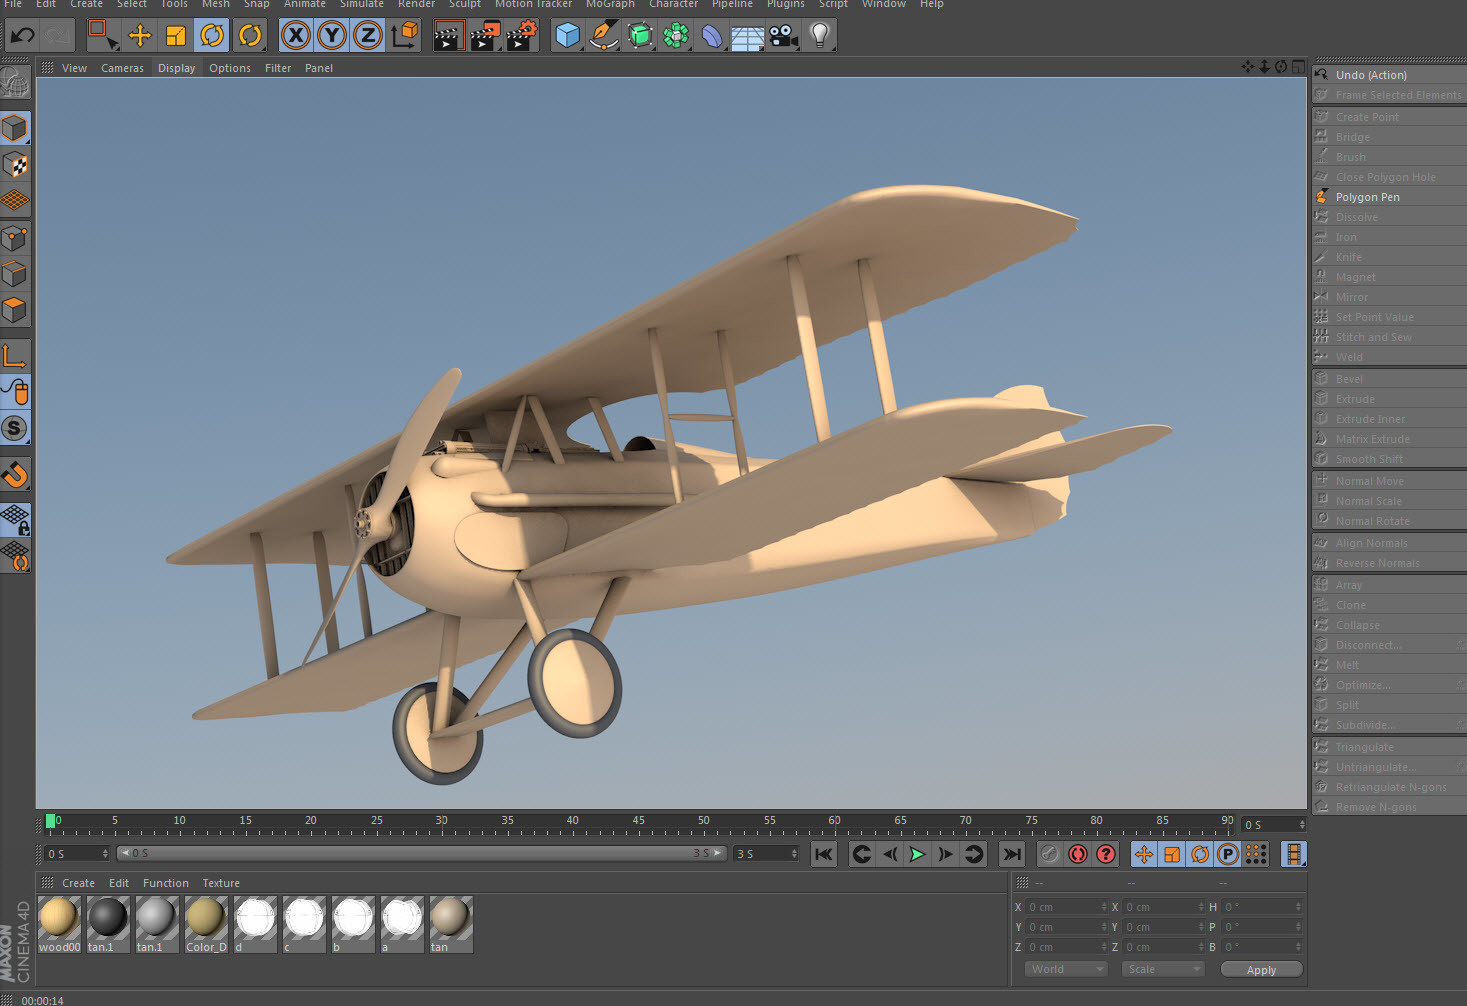
SPAD XIII - Final digital model built in Cinema 4D by Dale Jackson: Prints available at: https://pixels.com/featured/spad-xiii-dale-jackson.html

1: Starting to build the SPAD in Cinema 4D using a 10 sided cylinder

2: Cutting where the bulkheads would approximately be along the length of the fuselage

3: Shaping the fuselage along it's length

4: adjusting the polygons on the top, side and bottom surfaces. I'm working in symmetry mode at this point so I don't have to model the other side as well. Saves much time and effort.

5: Adusting the fuselage on the top and around the cockpit.

6: rendered surface with wire frame

7: Adding the struts and basic wheels

8: Continual refinement

9: Creating a VERY basic Hispano-Suiza 8 engine. Most of the engine is going to be unseen, except for a few parts, so I'm only making a very rough, simple engine.

10: Hispano-Suiza 8 engine (simplified)

11: test fitting the engine into the engine compartment.

12: This was my first attempt at the mesh grille over the engine compartment. However, after visiting the air museum and seeing it first hand, I removed this and recreated the grille.

13: I recreated the grille mesh as seen here.

14: this render has the old grille in place, but at least you can see the work on the propeller.

15: Creating the top and bottom wings

16: Creating the empennage

17: Worked on the guns and the exhaust pipe and refining the wings

18: Rear view
19: Work in progress, overall view.

20: SPAD XIII wireframe work in progress.

21: I wasn't sure how to go about this and I'm sure I would do it differently. But here is where I was tackling the vents that are all around the cowling.

22: Basically I made a piece that would just fit on top of the fuselage, instead of actually cutting into the fuselage itself. I kept these vents low poly

23: Cowling vent

24: Here's what the vents looked like after completion, or near completion.

25: A view of the placeholder gear struts

26: I created new gear struts in place of the placeholders.

27: Adjusting the aileron hinge position

28: adjusting the rudder hinge position

29: SPAD XIII overview render - work in progress

30: SPAD XIII overview render with wire frame - work in progress

31: SPAD XIII Overview render WIP

32: SPAD XIII Overview render WIP

33: SPAD XIII Overview render WIP

34: SPAD XIII Overview render WIP

35: SPAD XIII Overview render WIP

36: SPAD XIII Overview render WIP

37: SPAD XIII Overview render WIP

38: SPAD XIII Overview render WIP

39: SPAD XIII Overview render WIP

40: SPAD XIII Overview render WIP

41: Cockpit coaming structure using the SWEEP method. I created a spline that follows the contour of the cockpit hole and dropped that and a small circle (approx. the diameter of the coaming) into a SWEEP.

42: Cockpit coaming and raised headrest

43: Raised headrest area being built

44: Creating a seat cushion

45: Creating the wood inside the cockpit

46: Creating the wood areas inside the cockpit

47: Adding the stick and rudder pedals and instrument deck

48: Adding the stick and rudder pedals and instrument deck

49: Adding misc. wood items inside the cockpit

50: Adding misc. wood items inside the cockpit

51: Adding misc. wood items inside the cockpit

52: Adding misc. wood items inside the cockpit

53: Adding basic instruments

54: Cockpit refinements

55: Cockpit refinements

56: Throttle assembly

57: designing the metal switch plates in Illustrator

58: designing the metal switch plates in Illustrator

59: Cockpit refinements

60: Going to start sculpting the leather seat cushion

61: subdividing

62: then using the sculpting feature in Cinema 4D, I begin by making indentions into the cushion

63: Then I begin pushing and pulling the polygons around the edge of the cushion to create an unevenness around the cushion

64: After making indentions, I begin to pull polygons in a star shape around the indentions where the buttons will be going.

65: refining the "wrinkles" in the leather cushion

66: I've used the sculpting feature in Cinema 4D to sculpt the leather seat pad, adding the buttons on top.

67: Completed leather cushion

68: Completed leather cushion

69: Completed leather cushion

70: Completed leather cushion

71: Creating the harness system using the SWEEP method

72: Creating the harness system

73: Creating the latch for the harness system

74: Creating the latch for the harness system

75: Creating the latch for the harness system

76: Rolling the belt around the metal latch

77: Creating the latch for the harness system

78: Creating the adjustment piece for the harness system

79: Creating the adjustment piece for the harness system

80: Creating the the harness system

81: Creating the the harness system

82: Creating the the harness system

83: harness system

83: harness system

83: harness system

83: harness system

83: harness system

84: harness system

85: Creating the windshield first in Adobe Illustrator and exporting the lines out of it into Cinema 4D. You have to save with Illustrator 8.0 to import into Cinema 4D.

86: Illustrator lines become splines in Cinema 4D

87: Positioning the windshield splines into place

88: Extruding the splines into a thicker object

89: Bending the windshield

90: Rotating into place

91: checking size and positioning

92: basic texture and glass added

93: some light details

94: final windshield in place

95: More surface detail, and a mesh put over the lower vents.

96: Fasteners in place
97: SPAD XIII Cockpit Coaming Sculpt

98: Extruding the cockpit coaming. I'll be sculpting it further.

99: Cockpit coaming adjustments

100: Sculpting the coaming

101: sculpting indentions into the coaming

102: Adding rivets into the coaming
Modeling the SPAD XIII in Cinema 4D
This is my walk-through of building the SPAD XIII, a famous WWI airplane, using Cinema 4D. It's not meant to be a step-by step, but rather a generalized overview.